Deploying code
Magelify uses a Push-to-Deploy workflow. That means instead of editing files directly on a server, you always make changes in your local workspace and run git push to deploy your site/application.
The container filesystem is ephemeral which means any changes you make to files while the application is running will be lost on the next deploy or if the container is restarted.
Working with Git
The following section assumes that you have completed the Git setup instructions and set up authentication credentials in your Magelify account.
In order to deploy to Magelify you need to connect your local repository with your site's Git remote.
Configuring your local workspace
Depending on whether you're starting a new project or have an existing codebase, you can either clone the remote repository or add Magelify as a remote to your local workspace.
Option 1 - Clone a repository
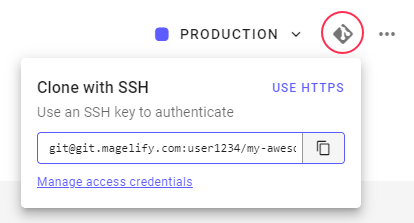
Navigate to your site dashboard and click on the Git icon in the upper right corner to find the clone URL. Select SSH or HTTPS based on whether you're using SSH key authentication or access tokens.
Navigate to your local workspace folder and clone the repository:
cd ~/my-projects
git clone <clone-url> .
This downloads the source code and automatically adds Magelify as a remote so you can push changes.
Option 2 - Initialize an existing repository
If you're migrating an existing site or already have a local Git repository, simply add Magelify as a new remote.
cd ~/my-projects/my-site
git init #skip if you're already using Git
git remote add origin <clone-url>
git pull origin master --allow-unrelated-histories
You can replace "origin" with an arbitrary name like "magelify" if you already have a remote called "origin". This allows you to maintain two separate remotes if you prefer to use another Git service as backup.
Depending on how you created your site you might get a merge conflict as our templates comes with some boilerplate code. You can either keep your local files or manually review the differences, as you might want to keep some of the default files which are customized specifically for the Magelify platform (e.g. the .gitignore).
You may notice a new directories named .clustered. This is required by the platform and should not be deleted.
Push a commit
These commands should be familiar if you've worked with Git previously.
The first step to create a new deploy is to commit your source files to the local repository:
git add -A
git commit -m "Short description of the changes"
Then push the changes to Magelify to trigger a new build:
git push origin master
Note: replace origin with your remote name if you called it something else.
Branches and tags
You can use any branching strategy of choice during development. By default Magelify will only deploy the master branch and named tags. If you prefer working with feature branches or a dedicated development branch, just merge into master whenever you want to deploy a new release.
Magelify does support mapping of additional branches to individual environments. Contact us for more information.
Deployments and builds
A new build is created every time you push a commit. A build contains a snapshot of your application code and all dependencies managed by the framework's package manager (e.g. composer or npm). The build results in a container image that is based on the exact same Git revision (commit SHA or tag name) that is referenced by the commit. This ensures consistent and atomic deploys.
To prevent a particular commit from triggering a new build, add [skip ci] to the end of the commit message.
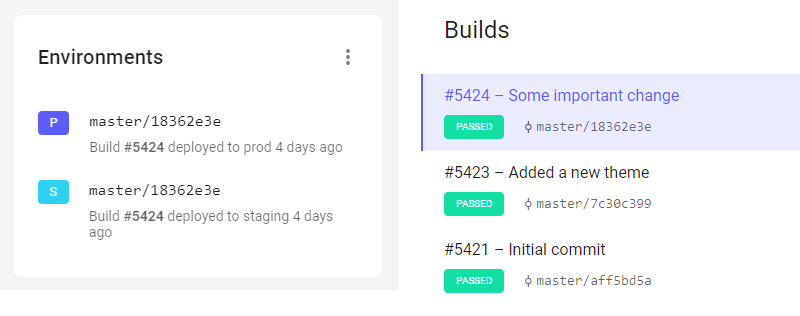
Deployments are pinned to a specific build revision, which allows different versions of your site to exist under separate environments (e.g. staging and prod).
You can quickly see which build is currently deployed under the Environments section in the Site Dashboard. Click on an item to see a list of past builds and when they were deployed.
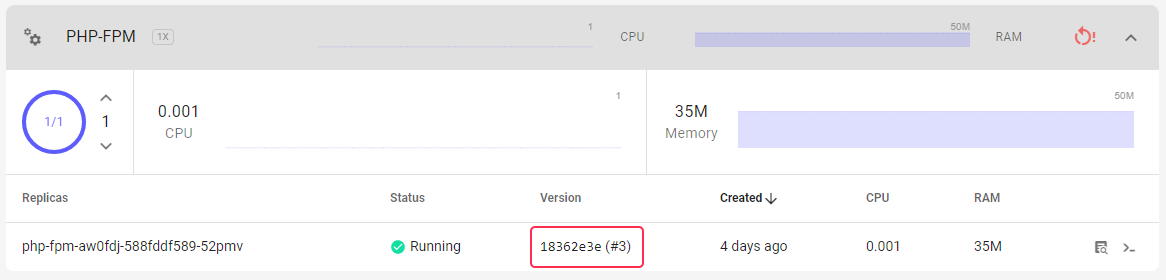
The build version/revision can also be found by clicking on a specific deployment on the Resources tab.
Since we keep a history of the last few builds you can easily deploy an earlier revision without having to rebuild the previous commit.
Deployment pipeline
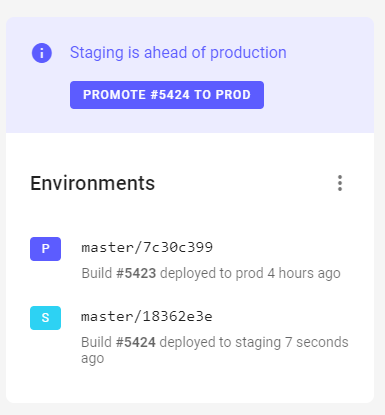
If your site contains multiple environments, e.g. staging and production, Magelify makes sure that a build goes through all the previous stages before it ends up in production. This is referred to as the deployment pipeline.
A user must manually promote a release from one environment to the next by clicking a button in the web UI. This way you have a better chance to discover bugs and unintended side effects by introducing a proper QA process. If any issues are discovered you can easily rollback a "bad" build before it reaches production.
Rollout strategies
A rollout strategy specifies how new revisions (builds) are deployed. Once a new image has been built, the application is updated according to the current rollout strategy:
At the moment, Magelify only supports the Rolling update strategy
Rolling update
The rolling update strategy allows zero downtime updates of the application. During rollout, only a subset of the replicas is updated at a time ensuring there is always a minimum number of replicas available. If there is a problem with the new release the rollout is paused.
Because there will be two versions of the application running simultaneously this strategy may not be suitable for all application types.
Blue/green deployment (aka staged deployment)
Contrary to a rolling update, the blue/green strategy creates a new, separate deployment without affecting the current one. This allows you to test the new version in a completely isolated environment before it gets deployed to production.
Canary deployment (aka feature toggling, A/B testing)
Canary deployment is a strategy where the new version is deployed into production alongside the old one, carefully controlling who gets to use the new version. The "experiment" is carefully monitored and gradually expanded to more users until all replicas as running the updated version.
This shares the same backwards compatibility requirements as the rolling update strategy.
CI/CD
Build triggers
A build trigger is a set of rules that defines how and when a new container image should be built by the CI/CD pipeline. By default, every git push to the master branch triggers a new build.
A build trigger consists of these parts:
- Action: when a build is triggered, can be one of:
- on every push (default)
- only tags
- only matching branches
- all except tags
- Spec: a Dockerfile template or custom Dockerfile
- Image stream: a reference that is used as a container's image source
- Arguments: optional arguments that are passed to the build process
- Pre-build script: optional bash instructions that are executed before each build
Applications that are created from a site template usually have pre-configured build triggers that requires no additional configuration. Advanced users may create custom build triggers for more control over the build process.
Certain application types supports additional configuration through build arguments. For example a PHP app can be built for different versions of PHP by setting the PHP_VERSION argument. Refer to each framework's documentation for information about which arguments are supported.
Environment mappings
A site environment can be set to automatically update whenever there are changes to a specific Git branch (push to deploy). By default, Magelify deploys master branch to staging or production, respectively, depending on whether or not a staging environment is enabled.
Pre-deploy hooks
Applications may require certain commands or scripts to run when a new build is deployed. This can be database migrations, cache flush, etc. Magelify supports pre-deploy hooks, which are arbitrary commands that runs just before the main application container starts.
Scaling your application
The primary reasons for wanting to scale an application is increased website traffic, or high load due to intensive background tasks or similar.
Magelify supports two ways of scaling workloads:
- Horizontal scaling, which adds additional instances/replicas of the application container (i.e. load balancing)
- Vertical scaling, which increases the resource limits of each container (i.e. more CPU/RAM)
Horizontal scaling is preferred as it offers better resource utilization and flexibility. Vertical scaling is sometimes used if the application doesn't easily support running on multiple nodes, such as a MySQL database server. A combination of horizontal and vertical scaling is also possible.
A common use case for horizontal scaling is to increase the number of PHP workers available for processing incoming requests. This in turn allows more concurrent users to your site without a drop in performance.
Both types of scaling is supported natively by Magelify's underlying container orchestration platform (Kubernetes).
Auto scaling
Auto scaling refers to the platforms ability to automatically adjusts the amount of compute resources available to the application in respond to changes in demand. Typically the scaling events are triggered by pre-configured metric thresholds, such as CPU load or requests per second.